How to Use Concealer Palettes to Map and Shape Brows: BROWtique Palette Product Guide
Mapping, shaping, carving...
These are just a few of the demands of a modern-day brow tech.
With the rise of Insta-worthy brows, we need our products to work harder than ever, which is why multi-use products are a must - like the Browtique Brow Carving Palette.

The BROWtique Palette
Whilst in lockdown my brain was ticking over on overdrive and I started doodling on a piece of paper, designing my brow palette from scratch. I wanted to create a multipurpose Brow Kit that’s a must-have for any Brow Stylist and I always thought that an all-in-1 kit would be so much easier. The kit can be used for different brow treatments and there are so many ways of getting creative with this palette.
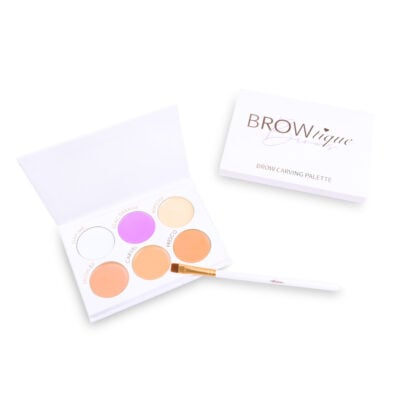
The palette includes:
- 2 mapping pastes - 1 being in colour for the ultimate Instagram brow wow factor.
- 1 highlighter
- 3 carving concealers
- A carving brush.

The Shades
Map-Me: This highly pigmented white shade is perfect for brow mapping. Use with a concealer brush or with thread to mark out the brow shape prior to tinting and hair removal.
Lilac Dreams: A non-white mapping paste for that extra wow factor for your social media posts. Can also be used to colour correct redness post hair removal.
Wipeout: A lighter shade for highlighting the brows. Apply under brow arches for added definition.
Brow Ex: A peach-toned neutral shade for concealing and carving.
Carvel: A beige-toned cool shade for concealing and carving.
Fresco: A warm-toned tan shade for concealing and carving.
Although this has been created with brow techs in mind, MUAs are also enjoying the palette's versatility, including...
- Brow carving and shaping Define and shape brows - more on this later.
- Eyeshadow priming Create a flawless base before applying eyeshadow and use for cut creases.
- Highlighting Use to highlight and 'lift' areas of the face during contouring.
- Colour Correcting The purple shade can be used to colour correct discolouration and redness, as well as brighten skin.
One of the many ways this palette can be used is for brow mapping...
How to Map Brows Using Concealer
What Does it Mean to Map Brows?
Mapping before any brow treatment will ensure that you deliver a more precise and symmetrical finish. Always remember, brows are sisters, not twins! Sometimes it’s hard to get them 100% symmetrical due to where the natural brows sit. Maybe one brow is slightly shorter, or higher, than the other, or any asymmetry could be due to the client's facial structure. So, using this technique before any brow treatment will help to achieve precise symmetry. This technique is especially good for brow stylists just starting out, as it helps you to better understand the shape you want to create.
Step-by-step mapping method
Read on for step-by-step instructions or watch this quick video of me using Lilac Dreams to map out brows.
Before you get started you may need (as well as the Browtique concealer palette and brush) mapping thread and a brow ruler, however, these are optional.
Video courtesy of Sharleen Percival at Browtique and Co.
Step 1
Drawn a line in the centre of both eyebrows by following up from the centre of the cupid's bow and up the nose. Use some mapping thread and your choice of mapping pastes from the palette.

Step 2
Place your next lines at the front of each brow or from the inner tear duct of the eye.

Step 3
Measure across the bottom of each eyebrow.
Step 4
Draw across the top of the eyebrows with a straight line, so that it touches the top of both arches. This will help to ensure balanced and symmetrical eyebrows.
")
Step 5
Mark the end of the eyebrow tail by drawing a line from the outside corner of the nose to the outside corner of the eye. You can extend or shorten the tail to create more dramatic or softer looks.

Step 6
Next, using your string and preferred mapping paste, measure from the start of the bottom of one brow and then the other diagonal up towards the arch of the brow and then down towards the tail.
Step 7
Repeat the same process as step 6 but starting at the top of the first brow.

Step 8
Optional, using one of the mapping pastes to carve out the mapping measurements. I find this really helps once the tint/henna has been applied as you can use the paste to neaten up the tint lines and creates a barrier to the skin. So, no excess tint gets on the skin.

All photos above are courtesy of Sharleen Percival at Browtique and Co.
Using Concealer To Shape + Carve Brows
Carving out the brows after any shaping appointment is a great way to deliver a crisp and flawless finish. In order to do this you'll need your trusted concealer brush and the correct shade for your client...
Choosing a shade
This palette contains a warm, cool and neutral shade - meaning there's an undertone for all. Plus, you can mix together your own custom shade to suit your client.
Warm undertones are typically associated with tan skin, however, fairer and darker complexions can also have warm undertones. Plus, tanned skin can also be cool or neutral. In fact, warm complexions will typically have more yellow undertones, cool skin tones typically present more pink and neutral is somewhere in between.
The best way to determine which shade will best suit your client is to swatch them near the brows. However, there are ways in which you can determine your client's undertones without applying product to the skin. Take a look at this article by Beauty Blender to find out more.
Top Tip: For fair clients, try using the highlighter shade, wipeout, as a concealer, or mix with another shade to lighten (or use the white mapping paste as a mixer).
How and where to apply concealer to shape brows
To finish off the brows after any shaping treatment, whether that’s henna, lamination or even a basic tint and tidy, I choose one of the 3 concealer shades that most suits the client's skin. I carve out the Brow using the carving brush and blend down the concealer by patting and pressing it into the skin to give a nice flawless finish.
I then use the highlighter wipeout to etch out under the brow and create a super sharp defined line that gives extra definition and really makes the brows pop!
Watch these videos to see how...
Videos courtesy of Sharleen Percival at Browtique and Co.
The Browtique palette isn't just a concealer palette. With shades to map, colour correct and highlight, this multi-functional palette is a must-have for brow techs. Use alongside some of the following tools to perfect your brow shaping skills... (and if you have your own concealer tips for brow techs, let us know in the comments below).